
TagHelper های سفارشی پیچیده در ASP.NET Core MVC

همزمان با انتشار ASP.NET Core ،مفهوم Tag Helpers هم معرفی شد - یک ویژگی جدید برای کپسوله کردن HTML markup. هدف از افزودن Tag Helpers به فریمورک، دادن تجربهای شبیه به HTML در هنگام استفاده از بیتهای markup توسط سرور بود. ایده در اینجا جایگزینی Helpers HTML نیست، بلکه ارائه رویکرد دیگری است که از همان قراردادهای HTML با استفاده از tagها و attributeها پیروی می کند.
TagHelper های سفارشی پیچیده در ASP.NET Core MVC
قبلن در یک پست در مورد نحوه ایجاد یک TagHelper ساده در ASP.NET Core MVC صحبت کردیم. در پست امروز ما این یک قدم را فراتر میگذاریم و یک TagHelper پیچیدهتر ایجاد میکنیم که از چندین بخش تشکیل شده است.
TagHelper برای دیالوگ های مدال بوت استرپ
ایجاد یک دیالوگ مودال در بوت استرپ نیازمندی کلی کد html ه.
<div class="modal fade" tabindex="-1" role="dialog">
<div class="modal-dialog">
<div class="modal-content">
<div class="modal-header">
<button type="button" class="close" data-dismiss="modal" aria-label="Close"><span aria-hidden="true">×</span></button>
<h4 class="modal-title">Modal title</h4>
</div>
<div class="modal-body">
<p>One fine body…</p>
</div>
<div class="modal-footer">
<button type="button" class="btn btn-default" data-dismiss="modal">Close</button>
<button type="button" class="btn btn-primary">Save changes</button>
</div>
</div><!-- /.modal-content -->
</div><!-- /.modal-dialog -->
</div><!-- /.modal -->استفاده از TagHelper در اینجا به سادهسازی markup کمک میکند، در این مورد، ما محتوای HTML داریم که میخواهیم آن را در 2 مکان مختلف اضافه کنیم: المان <div class="modal-body"></div> و المان <div class="modal-footer"></div>
راه حل این است که از 3 TagHelper مختلف استفاده کنید که می توانند از طریق TagHelperContext با یکدیگر ارتباط برقرار کنند.
در نهایت، ما میخواهیم markup مون به این شکل باشه:
<modal title="Modal title">
<modal-body>
<p>One fine body…</p>
</modal-body>
<modal-footer>
<button type="button" class="btn btn-default" data-dismiss="modal">Close</button>
<button type="button" class="btn btn-primary">Save changes</button>
</modal-footer>
</modal>
این راه حل از 3 TagHelper استفاده می کند: modal، modal-body و modal-footer. محتویات تگ modal-body در داخل <div class="modal-body"></div> و محتویات تگ <modal-footer> در داخل <div class="modal- قرار خواهد گرفت. عنصر footer"></div>. tag helper مدال کسی است که همه اینها را هماهنگ می کند.
محدود کردن والدین و فرزندان
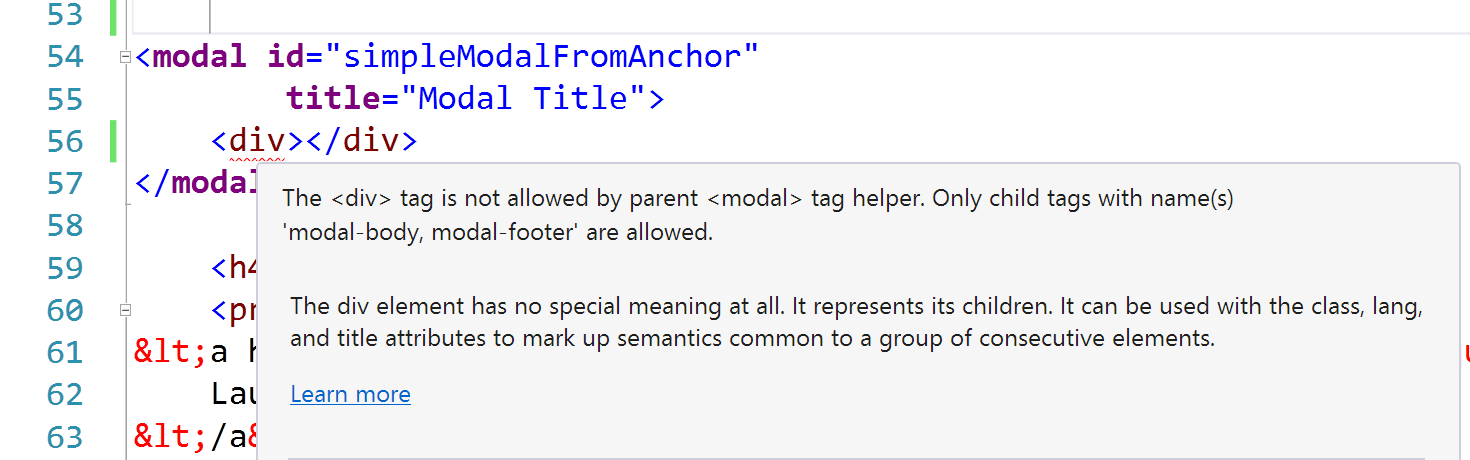
اول از همه، میخواهیم مطمئن شویم که <modal-body> و <modal-footer> فقط میتوانند در داخل تگ <modal> قرار گیرند و تگ <modal> فقط میتواند حاوی آن 2 تگ باشد. برای انجام این کار، ویژگی RestrictChildren را روی کمک کننده تگ modal و ویژگی ParentTag از ویژگی HtmlTargetElement را روی بدنه مدال و taghelperهای footer مودال تنظیم میکنیم:
[RestrictChildren("modal-body", "modal-footer")]
public class ModalTagHelper : TagHelper
{
     //...
}

[HtmlTargetElement("modal-body", ParentTag = "modal")]
public class ModalBodyTagHelper : TagHelper
{
    //...
}

[HtmlTargetElement("modal-footer", ParentTag = "modal")]
public class ModalFooterTagHelper : TagHelper
{
    //...
}
حالا اگر بخواهیم هر تگ دیگری را در تگ <modal> قرار دهیم، Razor یک پیغام خطای مفید بهمون میده.
دریافت محتوی از بچه ها
مرحله بعدی ایجاد یک کلاس context است که برای پیگیری(tracking) محتویات 2 tag helper فرزند استفاده میشه.
public class ModalContext
{
    public IHtmlContent Body { get; set; }
    public IHtmlContent Footer { get; set; }
}
در ابتدای متد ProcessAsync از تگ هلپر Modal، یک نمونه جدید از ModalContext ایجاد کنید و آن را به TagHelperContext فعلی اضافه کنید:
public override async Task ProcessAsync(TagHelperContext context, TagHelperOutput output)
{
    var modalContext = new ModalContext();
    context.Items.Add(typeof(ModalTagHelper), modalContext);
    //...
}
اکنون، در tag helperهای modal-body و modal-footer، نمونهای از آن ModalContext را از طریق TagHelperContext دریافت میکنیم. به جای رندر کردن خروجی، این tag helper های فرزند، ویژگیهای Body و Footer ModalContext را تنظیم میکنند.
[HtmlTargetElement("modal-body", ParentTag = "modal")]
public class ModalBodyTagHelper : TagHelper
{
    public override async Task ProcessAsync(TagHelperContext context, TagHelperOutput output)
    {
        var childContent = await output.GetChildContentAsync();
        var modalContext = (ModalContext)context.Items[typeof(ModalTagHelper)];
        modalContext.Body = childContent;
        output.SuppressOutput();
    }
}
در tag helper مودال ، ()output.GetChildContentAsync را فراخوانی می کنیم که باعث می شود tag helperهای فرزند اجرا و ویژگی ها را در ModalContext تنظیم کنند. پس از آن، دیگه فقط خروجی را همانطور که به طور معمول در tag helperها تنظیم می کنیم، تنظیم می کنیم و Body و Footer را در عناصر مناسب قرار می دهیم.
public override async Task ProcessAsync(TagHelperContext context, TagHelperOutput output)
{
var modalContext = new ModalContext();
context.Items.Add(typeof(ModalTagHelper), modalContext);
await output.GetChildContentAsync();
var template =
$@"<div class='modal-dialog' role='document'>
<div class='modal-content'>
<div class='modal-header'>
<button type = 'button' class='close' data-dismiss='modal' aria-label='Close'><span aria-hidden='true'>×</span></button>
<h4 class='modal-title' id='{context.UniqueId}Label'>{Title}</h4>
</div>
<div class='modal-body'>";
output.TagName = "div";
output.Attributes["role"] = "dialog";
output.Attributes["id"] = Id;
output.Attributes["aria-labelledby"] = $"{context.UniqueId}Label";
output.Attributes["tabindex"] = "-1";
var classNames = "modal fade";
if (output.Attributes.ContainsName("class"))
{
classNames = string.Format("{0} {1}", output.Attributes["class"].Value, classNames);
}
output.Attributes.SetAttribute("class", classNames);
output.Content.AppendHtml(template);
if (modalContext.Body != null)
{
output.Content.AppendHtml(modalContext.Body); //Setting the body contents
}
output.Content.AppendHtml("</div>");
if (modalContext.Footer != null)
{
output.Content.AppendHtml("<div class='modal-footer'>");
output.Content.AppendHtml(modalContext.Footer); //Setting the footer contents
output.Content.AppendHtml("</div>");
}
output.Content.AppendHtml("</div></div>");
}
نتیجه
نوشتن tag helperهای پیچیده با روابط والدین/فرزند، کار سادهای است. به نظر من، درک این رویکرد در اینجا بسیار سادهتر از رویکرد "مثل چندگانه" است که برای حل همان مشکل در Angular 1 استفاده میشود. unit test آسان است و مانند همیشه، ویژوال استودیو پیامهای خطا را مستقیماً در ویرایشگر HTML ارائه میکند. برای راهنمایی هر کسی که از tag helper شما استفاده می کند.
